Category Archives: Support

OCSetup/DISM, Component Name List…

Windows_7_Logo

There are two ways of installing components in Windows (scripted ways of course) i.e. you can use OCSetup or DISM Tool.

In both cases you have to supply component name like:

start /w ocsetup <windows_component_name>
or
dism /online /enable-feature:<windows_component_name>

In my case I had to add Tablet PC Components but had to clue what the component name was. These names are technical names and not what Windows Control Panel displays in “Turn Windows Features On or Off”. So how do I get the correct name for components I need to install? Its a rather simple task really, in elevated command  prompt type:

dism /online /get-features

If you would like to narrow it down a bit (list is quite long) you can pipe the output and look for “Tablet” lets say:

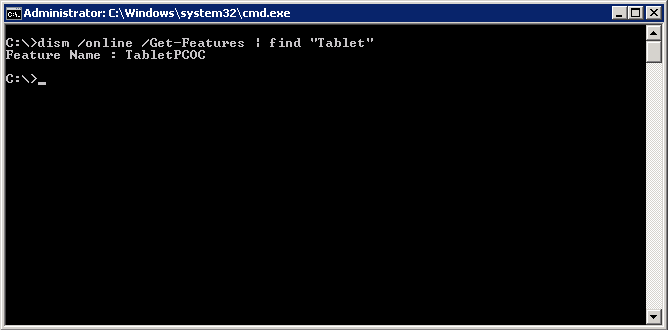
dism /online /get-features | find “Tablet”

To install it simply take TabletPCOC name and insert into either of the commands above instead of <windows_component_name>

Citrix: XenDesktop 5.x – Where Did ‘Logoff Behaviour’ Option Go?

Citrix_Logo_

Here is the scenario – XenDesktop 5.x, pooled/streamed desktops and the lack of ‘Logoff Behaviour’ option.

By default the minute you logoff from ICA session desktop shuts down. Wait, what? Yep, it will shutdown instead of restarting or doing nothing.

In XenDesktop 4 this behaviour could have been configured from the GUI directly but in XenDesktop 5.x it has been moved to command line, PowerShell to be precise.

So what’s the command and how do I configure it?

Here it goes:

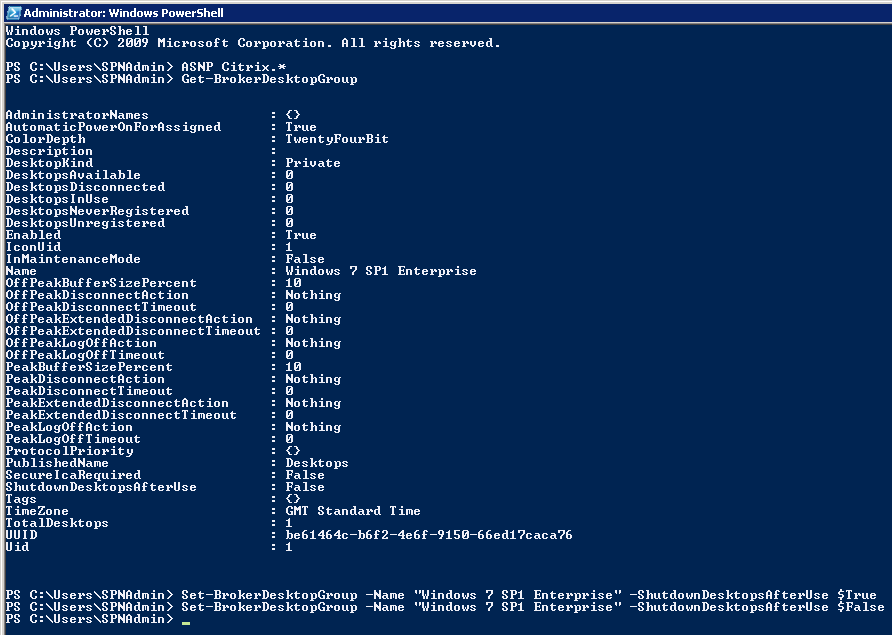
1] Load Citrix PowerShell extensions.

2] List all Desktop Groups in your environment.

3] Run the following commands to either enable or disable logoff behaviour for Desktop Group listed in point 2:

Set-BrokerDesktopGroup -Name “Windows 7 SP1 Enterprise” -ShutdownDesktopsAfterUse $True

Set-BrokerDesktopGroup -Name “Windows 7 SP1 Enterprise” -ShutdownDesktopsAfterUse $False

That should do it nicely.

vCMA Appliance – Hostname Won’t Survive Reboot

VMware_vSphere_Logo

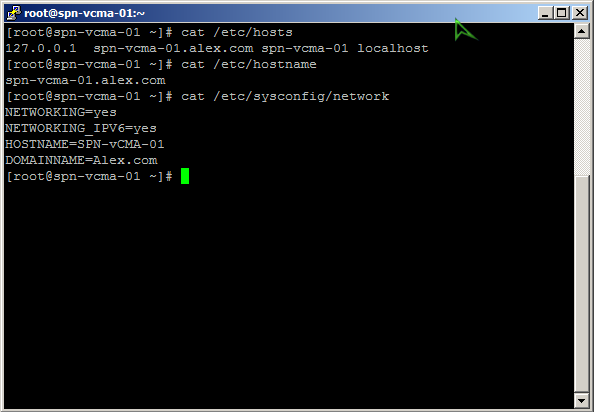
So in order to change the actual hostname of vCMA virtual appliance, from default localhost/localhost.localdom, we have to edit these files:

/etc/hosts

/etc/hostname

/etc/sysconfig/network

My vCMA is called SPN-vCMA-01 on Alex.com domain so after session with vi we should have this:


Nothing major you might think and quite rightly so. BUT the settings are not surviving a reboot! It all gets reverted back to localhost/localhost.localdom once you give the VM a kick…

The trick here is to add a pointer (PTR) record in your reverse lookup DNS zone (the same that vCMA points for name resolutions) and viola, tt suddenly remembers the correct hostname!

Once more thing you might want to do is to add A record for you applicance in forward lookup zone.

Find All Obsolete Computer Objects in SCCM Database

SCCM_Logo

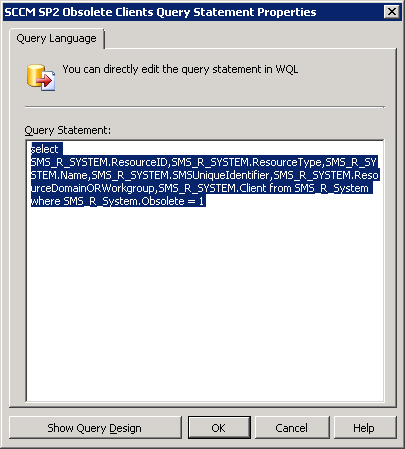
Very quick query to find all obsolete computer objects in site system database:

Code:

SELECT
    SMS_R_SYSTEM.ResourceID,
    SMS_R_SYSTEM.ResourceType,
    SMS_R_SYSTEM.Name,
    SMS_R_SYSTEM.SMSUniqueIdentifier,
    SMS_R_SYSTEM.ResourceDomainORWorkgroup,
    SMS_R_SYSTEM.Client

FROM
    SMS_R_System
WHERE
    SMS_R_System.Obsolete = 1

“There are no Master Images Associated with this Catalog.”

Citrix_Logo_

There are three main reasons to see “There are no Master Images Associated with this Catalog.” error when creating desktop catalog:

1] Level of permissions back to your Hypervisor is not sufficient. I’m using VMware vCenter and at the step of adding vCenter server you have to use some sort of account to connect back.

Exact permissions required are listed here:

http://support.citrix.com/proddocs/topic/xendesktop-rho/cds-vmware-rho.html

2] Video RAM set on the Master VM is configured as “Auto-detect settings”. You can find this under Settings -> Video card on your Master VM. Citrix article CTX128107 describing the problem:

http://support.citrix.com/article/CTX128107

3] DDC (Desktop Delivery Controller) during desktop catalog creation sees “Hard disk per VM” as 0 GB. Citrix article CTX129470 is here to help:

http://support.citrix.com/article/CTX128107

For me, personally, option 2 caused a lot of headaches! Its worth keeping all of them in mind as sometimes things can go high wire for no apparent reason…

XenDesktop 5.x – Problems After Removing Catalog from Desktop Studio…

Citrix_Logo_

So here is a rather simple task – deleting desktop catalog from Desktop Studio – would you agree? I certainly would up until today…

Scenario – I had desktop catalog called “Win7 SP1 Ent Desktops” which was deleted together with associated AD accounts.

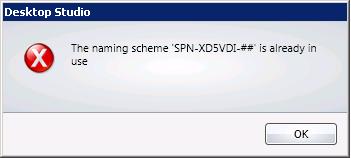
Attempts at creating a new catalog with a different name and the same naming scheme are failing with the following error:

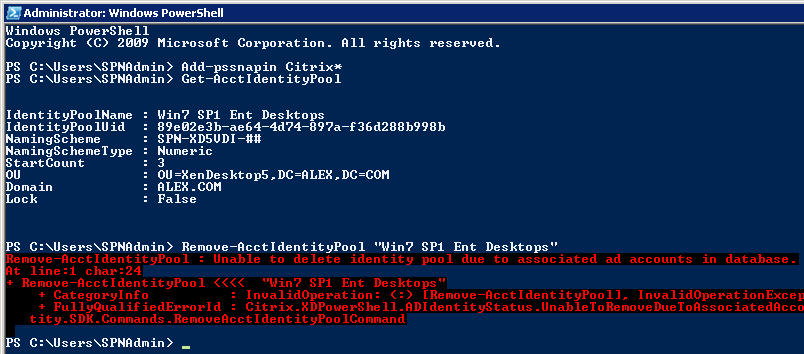
Diving deeper dressed up in a blue PowerShell suit reveals that my catalog still exist… Trying to delete it throws up more problems i.e. accounts are still associated with the catalog (that shouldn’t exist!):

1] Add-pssnapin Citrix*
2] Get-AcctIdentityPool
3] Remove-AcctIdentityPool -IdentityPoolName “Win7 SP1 Ent Desktops”

Continue reading

How to Enable Desktop Viewer on WI 5.x for XenDesktop 5

Citrix_Logo_

So I’m here sitting and having a play with XenDesktop 5, all goes well. At some point I’m re-creating WI site and Desktop Viewer toolbar is gone. What the heck just happen I say!

It turns out that I forgot to turn it on (its disabled by default). If you’re still not with me or don’t know what I’m on about take a look at the screenshot below:

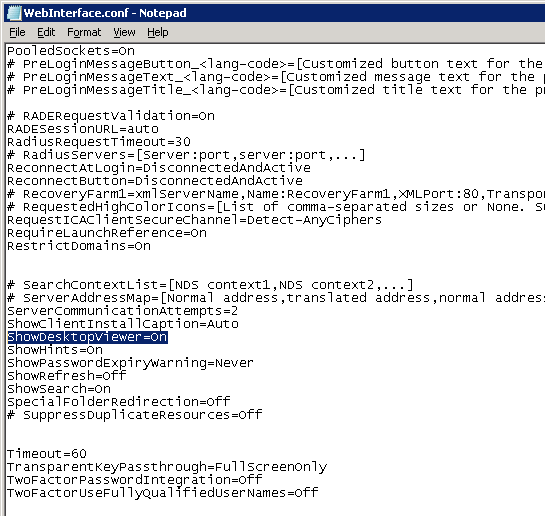
Now, to get it enabled we need to edit WebInterface.conf located under:

C:\inetpub\wwwroot\Citrix\Site_Name\conf

The value we are interested in is called ShowDesktopViewer, it needs to be uncommented and turned on if necessary:

And there you have it 😉

In case you’re wondering this also works on XenApp published desktops too.

All Unknown Computers Collection is Completely Empty in SCCM 2007!

SCCM_Logo

In case you managed to screw up, somehow, the membership of All Unknown Computers collection (like me!) here is the query that will bring back:

x86 Unknown Computer
x64 Unknown Computer

sub-collections for all of your sites! In my case All Unknown Computers was empty, completely messing up my OSD deployments…

Rescue query:

SELECT
    SMS_R_UNKNOWNSYSTEM.ResourceID,
    SMS_R_UNKNOWNSYSTEM.ResourceType,
    SMS_R_UNKNOWNSYSTEM.Name,
    SMS_R_UNKNOWNSYSTEM.Name,
    SMS_R_UNKNOWNSYSTEM.Name
FROM
    SMS_R_UnknownSystem
WHERE
    Decommissioned = 0

Orca – MSI Database Editor Tool

Windows_7_Logo

In case someone is looking for just the .msi as opposed the rest of the junk that Microsoft provides – here it is!

Download Orca.msi

Orca is kind of forgotten now, but still incredibly powerful, .msi database editor. If you ever had/will have something to do with application(s) delivery/deployment its simply a must have tool.

Each time I have to deploy an application, its no doubt, I will have to use Orca to some extend.

Remember Adobe Reader X and that nasty shortcut it creates on the desktop for all users? I bet you do. The only way to remove it is to hack the .msi database and drop “certain” record from “certain” table – job done!

Besides all that, ORCA is One Really Cool Application! 🙂

How to Configure the Maximum Rows Returned in the Values List in SCCM 2007

SCCM_Logo

This was bugging me for some time now and finally I have the solution, good old TechNet, eh?

Report Viewer in Configuration Manager 2007 limits the number of rows returned to 1,000 rows when you click Values and the values list displays for a prompt. The maximum number of rows returned by the query for the prompt that populates the values list can be modified by creating a registry key and setting a value on site system computers that have the reporting point role.

Warning!
Increasing the maximum number of rows for queries that return a large amount of data or for queries that are inefficiently written might cause performance issues when the values are displayed.

To configure the number of rows returned in a values list:

  • Open the Registry Editor on the reporting point computer.
  • On reporting points that run on a 32-bit operating system, navigate to HKEY_LOCAL_MACHINE\SOFTWARE\Microsoft\SMS\Reporting.
  • On reporting points that run on a 64-bit operating system, navigate to HKEY_LOCAL_MACHINE\SOFTWARE\Wow6432Node\Microsoft\SMS\Reporting.
  • Create a DWORD value named Values Rowcount, and then set its value to the number of rows that you want returned in the report query.
  • If you want to return all rows, set the value to 0xffffffff, which is the hexadecimal equivalent of –1.

The configured number of rows is returned by any prompt query that is run from this reporting point.

Registry key ready to be imported [setting the value to 5000 rows] can be downloaded from:

Here for x64 and here for x86 systems.