Office 2010 Pro PLUS – Remove “Shared Folder Synchronization” from Explorer Context Menu

Microsoft_Office_2010_Logo

Microsoft Office 2010 Pro and Pro PLUS adds handy (?) option to Windows Explorer context menu called “Shared Folder Synchronization”. This also appears in Standard Buttons toolbar in each Explorer window:

If you don’t use/like Microsoft SharePoint Workspace aka Groove (in Microsoft Office 2007) there is very little purpose for this addition to exist – here is how to remove it:

Either rename or delete the following registry key:

HKEY_LOCAL_MACHINE\SOFTWARE\Classes\CLSID\{6C467336-8281-4E60-8204-430CED96822D}

So rename would look like this:

HKEY_LOCAL_MACHINE\SOFTWARE\Classes\CLSID\OLD.{6C467336-8281-4E60-8204-430CED96822D}

Deletion can be completed by running this command:

REG DELETE HKEY_CLASSES_ROOT\CLSID\{6C467336-8281-4E60-8204-430CED96822D} /f

Also, third available option is to un-register GROOVEEX.DLL library file, command:

REGSVR32 /u GROOVEEX.DLL

OCSetup/DISM, Component Name List…

Windows_7_Logo

There are two ways of installing components in Windows (scripted ways of course) i.e. you can use OCSetup or DISM Tool.

In both cases you have to supply component name like:

start /w ocsetup <windows_component_name>
or
dism /online /enable-feature:<windows_component_name>

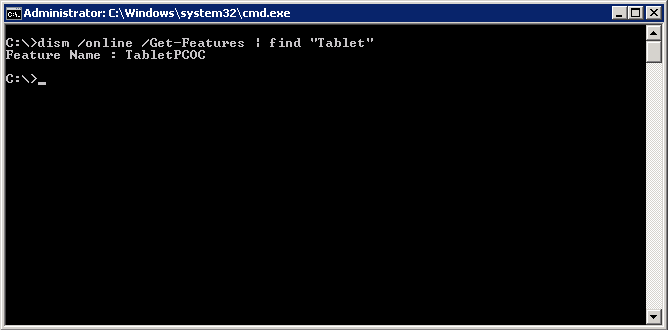
In my case I had to add Tablet PC Components but had to clue what the component name was. These names are technical names and not what Windows Control Panel displays in “Turn Windows Features On or Off”. So how do I get the correct name for components I need to install? Its a rather simple task really, in elevated command  prompt type:

dism /online /get-features

If you would like to narrow it down a bit (list is quite long) you can pipe the output and look for “Tablet” lets say:

dism /online /get-features | find “Tablet”

To install it simply take TabletPCOC name and insert into either of the commands above instead of <windows_component_name>

Kaplan Mountain Challenge 2012 – Help Us Raise Money For Charities!

On 18th of June as a part of Kaplan Mountain Challenge I will be hiking in beautiful Snowdonia National Park (home to the highest mountain in England and Wales!) to help raise money for four already chosen charities:

Ty Hafan – http://www.tyhafan.org

Child Victim of Crime – http://www.cvoc.org.uk

Every Child a Chance – http://www.everychildachancetrust.org

Helena Kennedy Foundation – http://www.hkf.org.uk

The hike itself is a nice short stroll for 50 kilometers up and down the mountain so it should be fairly easy (yeah right!)

Red Hot Techie Peppers got picked as a team name (nice and  not geeky!), here  is the link:

http://uk.virginmoneygiving.com/it

Now in order for this to happen we would like to raise at least £2500 which then can be donated to above charities. Please help us to make this happen! You can  donate by clicking on the below link:

Please donate what you can, amount doesn’t matter – even if its £1!

Citrix: XenDesktop 5.x – Where Did ‘Logoff Behaviour’ Option Go?

Citrix_Logo_

Here is the scenario – XenDesktop 5.x, pooled/streamed desktops and the lack of ‘Logoff Behaviour’ option.

By default the minute you logoff from ICA session desktop shuts down. Wait, what? Yep, it will shutdown instead of restarting or doing nothing.

In XenDesktop 4 this behaviour could have been configured from the GUI directly but in XenDesktop 5.x it has been moved to command line, PowerShell to be precise.

So what’s the command and how do I configure it?

Here it goes:

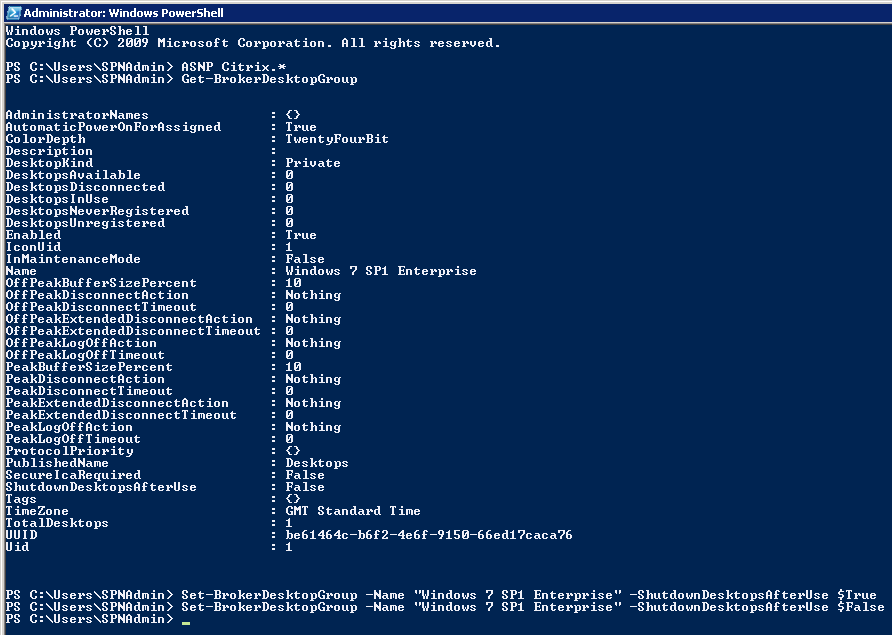
1] Load Citrix PowerShell extensions.

2] List all Desktop Groups in your environment.

3] Run the following commands to either enable or disable logoff behaviour for Desktop Group listed in point 2:

Set-BrokerDesktopGroup -Name “Windows 7 SP1 Enterprise” -ShutdownDesktopsAfterUse $True

Set-BrokerDesktopGroup -Name “Windows 7 SP1 Enterprise” -ShutdownDesktopsAfterUse $False

That should do it nicely.

vCMA Appliance – Hostname Won’t Survive Reboot

VMware_vSphere_Logo

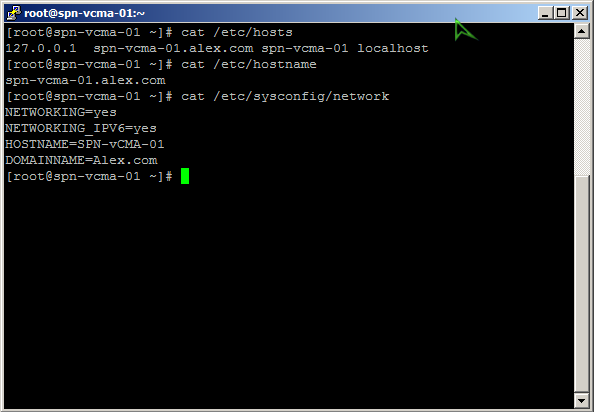
So in order to change the actual hostname of vCMA virtual appliance, from default localhost/localhost.localdom, we have to edit these files:

/etc/hosts

/etc/hostname

/etc/sysconfig/network

My vCMA is called SPN-vCMA-01 on Alex.com domain so after session with vi we should have this:


Nothing major you might think and quite rightly so. BUT the settings are not surviving a reboot! It all gets reverted back to localhost/localhost.localdom once you give the VM a kick…

The trick here is to add a pointer (PTR) record in your reverse lookup DNS zone (the same that vCMA points for name resolutions) and viola, tt suddenly remembers the correct hostname!

Once more thing you might want to do is to add A record for you applicance in forward lookup zone.

Find All Obsolete Computer Objects in SCCM Database

SCCM_Logo

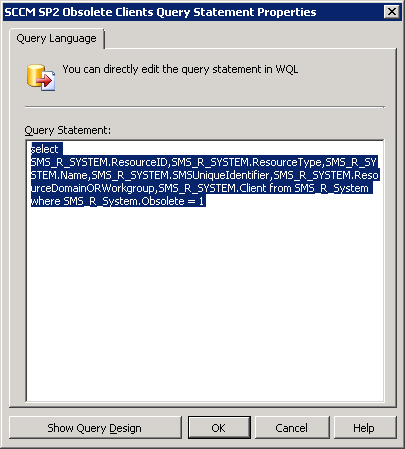
Very quick query to find all obsolete computer objects in site system database:

Code:

SELECT
    SMS_R_SYSTEM.ResourceID,
    SMS_R_SYSTEM.ResourceType,
    SMS_R_SYSTEM.Name,
    SMS_R_SYSTEM.SMSUniqueIdentifier,
    SMS_R_SYSTEM.ResourceDomainORWorkgroup,
    SMS_R_SYSTEM.Client

FROM
    SMS_R_System
WHERE
    SMS_R_System.Obsolete = 1

“There are no Master Images Associated with this Catalog.”

Citrix_Logo_

There are three main reasons to see “There are no Master Images Associated with this Catalog.” error when creating desktop catalog:

1] Level of permissions back to your Hypervisor is not sufficient. I’m using VMware vCenter and at the step of adding vCenter server you have to use some sort of account to connect back.

Exact permissions required are listed here:

http://support.citrix.com/proddocs/topic/xendesktop-rho/cds-vmware-rho.html

2] Video RAM set on the Master VM is configured as “Auto-detect settings”. You can find this under Settings -> Video card on your Master VM. Citrix article CTX128107 describing the problem:

http://support.citrix.com/article/CTX128107

3] DDC (Desktop Delivery Controller) during desktop catalog creation sees “Hard disk per VM” as 0 GB. Citrix article CTX129470 is here to help:

http://support.citrix.com/article/CTX128107

For me, personally, option 2 caused a lot of headaches! Its worth keeping all of them in mind as sometimes things can go high wire for no apparent reason…

XenDesktop 5.x – Problems After Removing Catalog from Desktop Studio…

Citrix_Logo_

So here is a rather simple task – deleting desktop catalog from Desktop Studio – would you agree? I certainly would up until today…

Scenario – I had desktop catalog called “Win7 SP1 Ent Desktops” which was deleted together with associated AD accounts.

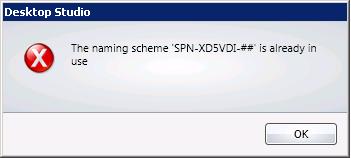
Attempts at creating a new catalog with a different name and the same naming scheme are failing with the following error:

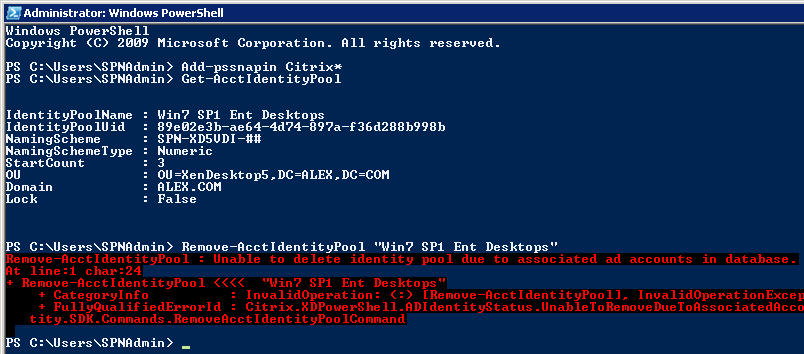
Diving deeper dressed up in a blue PowerShell suit reveals that my catalog still exist… Trying to delete it throws up more problems i.e. accounts are still associated with the catalog (that shouldn’t exist!):

1] Add-pssnapin Citrix*
2] Get-AcctIdentityPool
3] Remove-AcctIdentityPool -IdentityPoolName “Win7 SP1 Ent Desktops”

Continue reading

How to Enable Desktop Viewer on WI 5.x for XenDesktop 5

Citrix_Logo_

So I’m here sitting and having a play with XenDesktop 5, all goes well. At some point I’m re-creating WI site and Desktop Viewer toolbar is gone. What the heck just happen I say!

It turns out that I forgot to turn it on (its disabled by default). If you’re still not with me or don’t know what I’m on about take a look at the screenshot below:

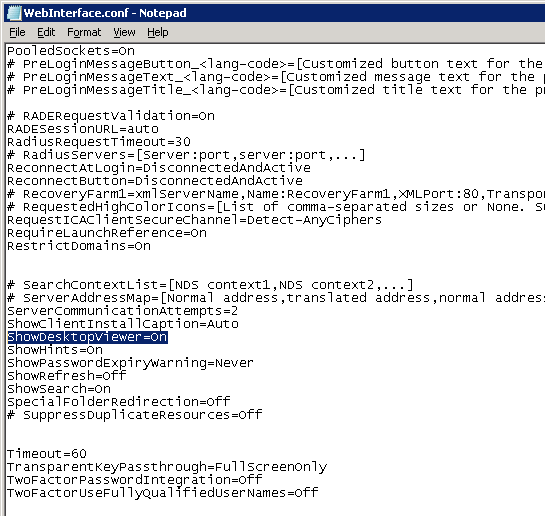
Now, to get it enabled we need to edit WebInterface.conf located under:

C:\inetpub\wwwroot\Citrix\Site_Name\conf

The value we are interested in is called ShowDesktopViewer, it needs to be uncommented and turned on if necessary:

And there you have it 😉

In case you’re wondering this also works on XenApp published desktops too.

Well, what do you know! I’m a VCP… 4!

That’s right, you’re reading this correctly – I managed to pass my VCP-410 certification exam about a week ago with a very respectable score! Very pleased with myself to be honest.

Exam itself was a bit on the hard side due to me not having all the kit to play with – you can read this primarily as a FC SAN and all that goes with it I suppose.

In order to properly prepare I had to take a week off from work but it was well worth it. I mean not like I had to study from scratch, it was more of a revision week rather than learning the product from ground up which always helps.

Another stressing factor during the exam was the dreadful clock ticking against me, 85 questions in 90 minutes is pretty tight, 1 minute and few seconds to read the question, understand it, read all the answers and eliminate the less obvious ones is TIGHT.

5-10% of questions had only 1 answer, rest had either 2 or 3 possible answers. Questions were constructed in a very crafty way (some of them at least) so had to be on top of my game in order to don’t be caught “clicking too fast”.

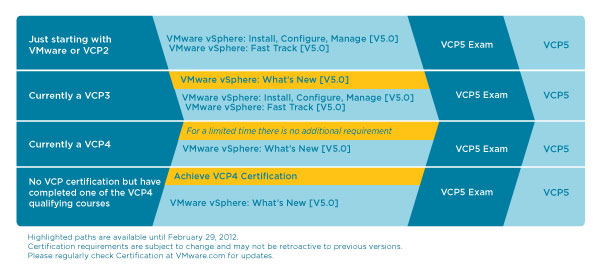
Now that VCP-510 is out and if you take, and pass, the exam before end of Feb 2012 there is no need to take any classroom training. As I’m on VCP-410 already I would have to take the VMware vSphere: What’s New [V5.0] course, if I wasn’t then its start from scratch by taking the VMware vSphere: Install, Configure, Manage [V5.0]. Not that I mind but as I, most likely, would end up paying from my own pocket – every little counts! So the plan is to try to pass the VCP-510 before end of Feb and studying shall commence asap.

Diagram courtesy of VMware.com explaining available career paths:
Wish me luck then as I’m going to need it to upgrade to VCP-510!