Category Archives: ConfigMgr

Enabling BitLocker fails with “BitLocker Setup could not find a target system drive. You may need to manually prepare your drive for BitLocker”

Windows_7_Logo

My workplace has finally decided to start encrypting their mobile devices with BitLocker. After number of laptops completed successfully (and without any major issues) today we have hit problems when BitLocker wizard would fail with the following message:

“BitLocker Setup could not find a target system drive. You may need to manually prepare your drive for BitLocker”

Enabling_BitLocker_fails_with_BitLocker_Setup_could_not_find_a_target_system_drive_You_may_need_to_manually_prepare_your_drive_for_BitLocker_1

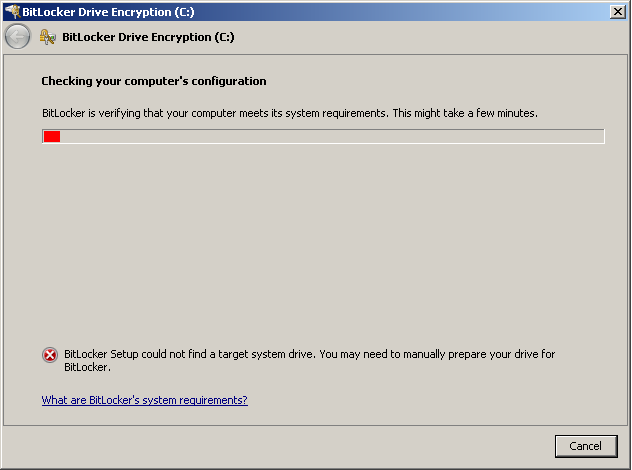
So far only one machine was affected but there could easily be others. Solution to this issue was not immediately obvious but its essentially due to Windows (or BitLocker wizard) not being able to shrink the drive to create the system partition that’s required for BitLocker (there was only one partition). Trying to manually shrink the drive using Disk Management would not work too as “Size of available shrink space in MB:” was equaling to 0:

Enabling_BitLocker_fails_with_BitLocker_Setup_could_not_find_a_target_system_drive_You_may_need_to_manually_prepare_your_drive_for_BitLocker_2

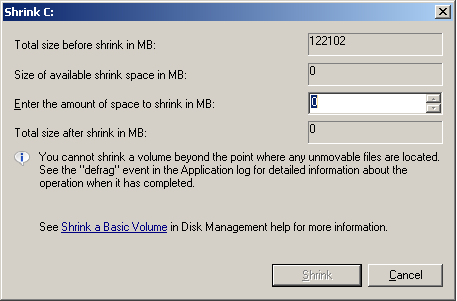
Now this number was showing 44MB before I ran Windows Defrag tool but now is 0MB meaning you cannot shrink the drive at all (not even by 1MB!) In Windows Explorer, internal hard drive was showing 120GB in size with roughly 60GB free so there was plenty of free disk space available in order to re-size the partitions.

Two quick fixes that were applied to finally resolve this are as follows:

  • Since the problematic machine was a laptop (Dell Latitude E6230) hibernation was turned off (powercfg -h off in command line)
  • System Restore points were also deleted (cleanmgr is the command, then More Options tab, System Restore and Shadow Copies and Clean up)
  • After this I re-run BitLocker drive encryption wizard and all was happy again!

    Side note – trying to manually prep the drive using bdehdcfg i.e. bdehdcfg -target c: shrink -size 300 -quiet -restart was not working too.

    Reporting Services tab not showing in SCCM console after R3 upgrade? Here’s how to fix it.

    SCCM_Logo

    Recently I have upgraded my SCCM central server which was running 2007 SP2 to 2007 R3 and encountered interesting issue. Basically after all reports have been imported I couldn’t see Reporting Services tab in my console to take advantage of any pre-defined reports showing power consumption etc. Currently my console looks as follows:

    Reporting_Services_tab_not_showing_in_SCCM_console_after_R3_upgrade_Here_is_how_to_fix_it_1

    where the same console on my central server has the tab I’m missing which its showing up just fine:

    Reporting_Services_tab_not_showing_in_SCCM_console_after_R3_upgrade_Here_is_how_to_fix_it_2

    Solution to get this problem fixed is to install hotfix from Microsoft which happens to be a pre-requisite before you install R3 on your client computer with SCCM console. Link:

    http://support.microsoft.com/kb/977384/en-us

    If you’re after the actual .msi ready to be installed you can get it from here (downloading hotfixes from Microsoft can be a bit of pain sometimes):

    SCCM2007-SP2-KB977384-ENU

    …at this point you should be all set to install the R3 upgrade to your console which will bring the Reporting Services tab.

    SCCM 2007 R3 – Remove All Packages from DP (Distribution Point)

    SCCM_Logo

    Lets assume that you have to decommission a distribution point that’s part of your ConfigMgr 2007 R3 infrastructure. Doing it the clean way would mean manually removing all packages, you have ever copied, which is definitely not fun. Initial copy of packages, when the DP is first setup, has a nice feature called “Copy Packages” but there is absolutely nothing allowing you to remove them. Pretty stupid really as trying to find every single package and manually “Manage Distribution Point” can take literally hours… Fortunately there is very handy tool to help us out here called “ConfigMgr 2007 Distribution Point Package Utility” created by Cory Becht.

    This utility queries the primary site server for all of its distribution points including child sites and then displays the packages for each distribution point. You check or uncheck which ones you want on that distribution point. You can also copy the packages list from one DP to another.

    This utility was done in Visual Studio 2005, so it does require .NET Framework 2.0
    Version History:

    1.3 – Now includes duplicating the packages of another distribution point.
    1.2 – Updated to include new ConfigMgr 2007 classes for packages (SoftwareUpdate, BootImage, etc.)
    1.1 – Fixed multiple DP’s per site error.
    1.01 – Included “Select All” button for packages.

    Continue reading

    Find All Duplicated Computer Objects in SCCM Database…

    SCCM_Logo

    Here is the query that will find all duplicated computer objects in your database. Really useful when OSD is involved! Example of that we are trying to get rid of:

    Now, in order to identify the duplicates we need to create a new collection with following query:

    Code:

    select R.ResourceID,R.ResourceType,R.Name,R.SMSUniqueIdentifier,R.ResourceDomainORWorkgroup,R.Client from SMS_R_System as r full join SMS_R_System as s1 on s1.ResourceId = r.ResourceId full join SMS_R_System as s2 on s2.Name = s1.Name where s1.Name = s2.Name and s1.ResourceId != s2.ResourceId and R.Client = null

    Once done you can click on the collection itself and safely select “Delete Special” to remove all duplicates!

    If you guys have any questions please leave a comment down below.

    Download links for MDT 2010 Update 1….

    MDT 2010 Update 1 Logo

    If you’re looking for MDT 2010 Update 1 then Microsoft STILL provides download links for it:

    http://www.microsoft.com/en-us/download/details.aspx?id=2932

    All other links have been replaced with MDT 2012 so grab it while you can!

    One thing to keep in mind here is that official Microsoft support for MDT 2010 Update 1 ends in April 2013.

    Enjoy!

    EDIT – 3rd of December 2013

    Looks like Microsoft have taken the links down – I have uploaded both x86 and x64 versions here:

    MicrosoftDeploymentToolkit2010_x86
    MicrosoftDeploymentToolkit2010_x64

    Find All Obsolete Computer Objects in SCCM Database

    SCCM_Logo

    Very quick query to find all obsolete computer objects in site system database:

    Code:

    SELECT
        SMS_R_SYSTEM.ResourceID,
        SMS_R_SYSTEM.ResourceType,
        SMS_R_SYSTEM.Name,
        SMS_R_SYSTEM.SMSUniqueIdentifier,
        SMS_R_SYSTEM.ResourceDomainORWorkgroup,
        SMS_R_SYSTEM.Client

    FROM
        SMS_R_System
    WHERE
        SMS_R_System.Obsolete = 1

    All Unknown Computers Collection is Completely Empty in SCCM 2007!

    SCCM_Logo

    In case you managed to screw up, somehow, the membership of All Unknown Computers collection (like me!) here is the query that will bring back:

    x86 Unknown Computer
    x64 Unknown Computer

    sub-collections for all of your sites! In my case All Unknown Computers was empty, completely messing up my OSD deployments…

    Rescue query:

    SELECT
        SMS_R_UNKNOWNSYSTEM.ResourceID,
        SMS_R_UNKNOWNSYSTEM.ResourceType,
        SMS_R_UNKNOWNSYSTEM.Name,
        SMS_R_UNKNOWNSYSTEM.Name,
        SMS_R_UNKNOWNSYSTEM.Name
    FROM
        SMS_R_UnknownSystem
    WHERE
        Decommissioned = 0

    How to Configure the Maximum Rows Returned in the Values List in SCCM 2007

    SCCM_Logo

    This was bugging me for some time now and finally I have the solution, good old TechNet, eh?

    Report Viewer in Configuration Manager 2007 limits the number of rows returned to 1,000 rows when you click Values and the values list displays for a prompt. The maximum number of rows returned by the query for the prompt that populates the values list can be modified by creating a registry key and setting a value on site system computers that have the reporting point role.

    Warning!
    Increasing the maximum number of rows for queries that return a large amount of data or for queries that are inefficiently written might cause performance issues when the values are displayed.

    To configure the number of rows returned in a values list:

    • Open the Registry Editor on the reporting point computer.
    • On reporting points that run on a 32-bit operating system, navigate to HKEY_LOCAL_MACHINE\SOFTWARE\Microsoft\SMS\Reporting.
    • On reporting points that run on a 64-bit operating system, navigate to HKEY_LOCAL_MACHINE\SOFTWARE\Wow6432Node\Microsoft\SMS\Reporting.
    • Create a DWORD value named Values Rowcount, and then set its value to the number of rows that you want returned in the report query.
    • If you want to return all rows, set the value to 0xffffffff, which is the hexadecimal equivalent of –1.

    The configured number of rows is returned by any prompt query that is run from this reporting point.

    Registry key ready to be imported [setting the value to 5000 rows] can be downloaded from:

    Here for x64 and here for x86 systems.