Author Archives: Adrian Kielbowicz

All Unknown Computers Collection is Completely Empty in SCCM 2007!

SCCM_Logo

In case you managed to screw up, somehow, the membership of All Unknown Computers collection (like me!) here is the query that will bring back:

x86 Unknown Computer
x64 Unknown Computer

sub-collections for all of your sites! In my case All Unknown Computers was empty, completely messing up my OSD deployments…

Rescue query:

SELECT
    SMS_R_UNKNOWNSYSTEM.ResourceID,
    SMS_R_UNKNOWNSYSTEM.ResourceType,
    SMS_R_UNKNOWNSYSTEM.Name,
    SMS_R_UNKNOWNSYSTEM.Name,
    SMS_R_UNKNOWNSYSTEM.Name
FROM
    SMS_R_UnknownSystem
WHERE
    Decommissioned = 0

Orca – MSI Database Editor Tool

Windows_7_Logo

In case someone is looking for just the .msi as opposed the rest of the junk that Microsoft provides – here it is!

Download Orca.msi

Orca is kind of forgotten now, but still incredibly powerful, .msi database editor. If you ever had/will have something to do with application(s) delivery/deployment its simply a must have tool.

Each time I have to deploy an application, its no doubt, I will have to use Orca to some extend.

Remember Adobe Reader X and that nasty shortcut it creates on the desktop for all users? I bet you do. The only way to remove it is to hack the .msi database and drop “certain” record from “certain” table – job done!

Besides all that, ORCA is One Really Cool Application! 🙂

How to Configure the Maximum Rows Returned in the Values List in SCCM 2007

SCCM_Logo

This was bugging me for some time now and finally I have the solution, good old TechNet, eh?

Report Viewer in Configuration Manager 2007 limits the number of rows returned to 1,000 rows when you click Values and the values list displays for a prompt. The maximum number of rows returned by the query for the prompt that populates the values list can be modified by creating a registry key and setting a value on site system computers that have the reporting point role.

Warning!
Increasing the maximum number of rows for queries that return a large amount of data or for queries that are inefficiently written might cause performance issues when the values are displayed.

To configure the number of rows returned in a values list:

  • Open the Registry Editor on the reporting point computer.
  • On reporting points that run on a 32-bit operating system, navigate to HKEY_LOCAL_MACHINE\SOFTWARE\Microsoft\SMS\Reporting.
  • On reporting points that run on a 64-bit operating system, navigate to HKEY_LOCAL_MACHINE\SOFTWARE\Wow6432Node\Microsoft\SMS\Reporting.
  • Create a DWORD value named Values Rowcount, and then set its value to the number of rows that you want returned in the report query.
  • If you want to return all rows, set the value to 0xffffffff, which is the hexadecimal equivalent of –1.

The configured number of rows is returned by any prompt query that is run from this reporting point.

Registry key ready to be imported [setting the value to 5000 rows] can be downloaded from:

Here for x64 and here for x86 systems.

VMware vDR – Default Username and Password

VMware_vSphere_Logo

After installing VMware Data Recovery appliance and navigating to:

http://[vDR-Hostname/IP]:5480

you’ll be asked for credentials to login, these are as follows:

Username: root

Password: vmw@re

Not the rocket science to remember but I often find myself wondering why admin/admin doesn’t work! 🙂

Patching Samsung HD204UI’s HDDs

Samsung have released new patch for their HD204UI hard drives some time ago to fix:

If identify command is issued from host during NCQ write command in the condition of PC, write condition is unstable. So it can make the loss of written data.

Samsung announcement ==> http://www.samsung.com/global/business/hdd/faqView.do?b2b_bbs_msg_id=386

so I have decided to patch drives in my NAS to comply. At the end of the day the last thing I want is corrupted data and hours of data integrity checks to make sure nothing is corrupted.

Pretty horrendous thought to he honest i.e. integrity checks on few TBs of data.

Anyway, getting on with the patching – what you need to have should consist of:

1] HD204UI hard drive (!), I happened to have the grey import one i.e. /Z4.
2] .iso image with the patch and FreeDOS burned to a blank CD/DVD,
3] A PC with SATA controller set to IDE/Legacy mode.

Note: RAID/AHCI will not work, pretty much standard these days, if you want to do any firmware updated/patching is IDE/Legacy mode.

Download and burn the .iso file from ==> here

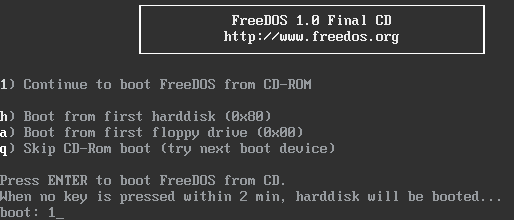
Boot your computer up using the recently burned CD/DVD and pick option 1 to carry on booting to FreeDOS…
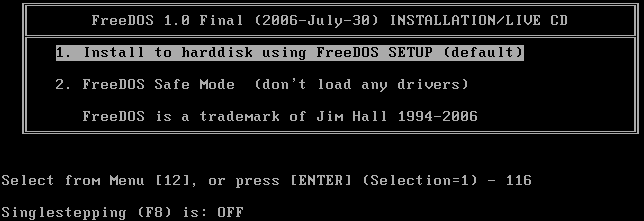
Again number 1 is the option we want to install to hard disk…
Then pick your language – English in my case…

Next screen is to select “Run FreeDOS from CD-ROM (return to command prompt)” …
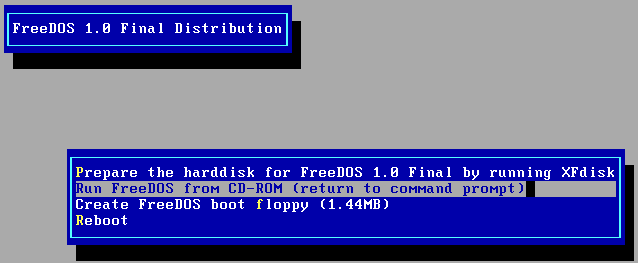
Once in command prompt all we have to do is to issue the command to patch the hard drives 🙂

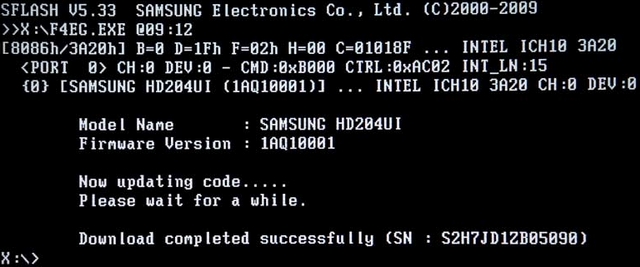
Type F4EG / F4EG.exe or simply just f4eg

As you can see it all went well and operation was successful!

Well done, now you have to repeat this for every hard drive you have, in my case all 5 of them.

Hello world!

Hey there! Welcome to my vBlog.

As you have probably guessed by now, its gonna be me vs VMware flagship bare metal hypervisor – ESX/i… [not all the time though!]

Second part of entertainment will be provided by System Centre Configuration Manager or vNext in later releases.

Strong advice:

Grab the RSS feed and sit tight awaiting updates! :)

Adrian